
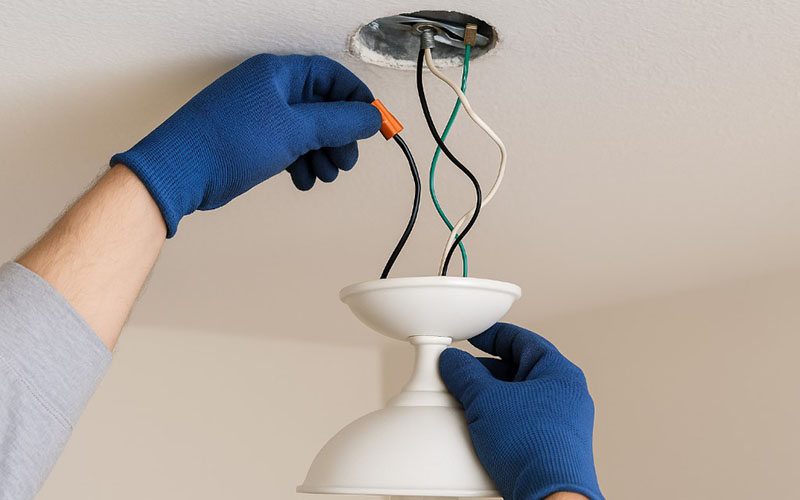
Upgrading the lighting in a room is one of the most impactful home improvement projects you can undertake. A new light fixture can instantly transform the ambiance, improve visibility, and modernize a dated space. While working with electricity can feel intimidating, replacing an existing light fixture is a straightforward task that most homeowners can accomplish safely without hiring a professional electrician.
The secret to a successful installation lies in methodical preparation and a strict adherence to safety protocols. By understanding the basics of electrical wiring and following the proper sequence of steps, you can complete this project with absolute confidence. This guide provides a comprehensive, walk-through of the entire process, from cutting the power to hanging your beautiful new fixture.
Prioritizing Safety and Assembling Tools
Before handling any electrical component, you must prioritize personal safety. Electricity demands respect, and bypassing safety steps can lead to severe shocks or electrical fires.
The most critical step of the entire project is shutting off the electrical power at the source. Do not simply flip the wall switch to the off position. Wall switches can occasionally be wired incorrectly, leaving live current flowing to the fixture even when the switch is off. Always locate your home main electrical service panel, find the specific circuit breaker governing the room where you are working, and flip that breaker completely off.
To ensure a smooth, uninterrupted workflow, gather all your necessary tools and materials before cutting the power:
-
Non-contact voltage tester: The most crucial safety tool in your kit to verify the wires are completely dead.
-
Screwdrivers: Both a flathead and a Phillipshead screwdriver for mounting screws.
-
Wire strippers and cutters: To prep the wire ends if they are frayed or cut too short.
-
Electrical tape: For securing wire connectors and marking wires if necessary.
-
Wire nuts or leverage connectors: To join the electrical wires securely.
-
Safety glasses: To protect your eyes from falling drywall dust, debris, or old insulation.
-
A sturdy stepladder: Never stretch or stand on an unstable chair while working on a ceiling fixture.
Step 1: Verifying the Power is Off
Once you have flipped the correct circuit breaker at the main panel, return to the room and attempt to turn on the existing light fixture using the wall switch. If the light turns on, you have flipped the wrong breaker. Return to the panel and check the labeling again until the light remains completely dark when the switch is flipped.
Even when the light stays off, you must visually and physically confirm that no residual voltage remains in the electrical box. Climb your stepladder and carefully remove the decorative canopy or globe covering the fixture wiring connection. Loosen the mounting screws holding the fixture base to the ceiling junction box, allowing the unit to gently lower so the internal wiring connections are fully exposed.
Turn on your non-contact voltage tester. Before testing the ceiling wires, place the tester near a known live outlet or cord to verify that its battery and internal sensor are functioning correctly. Once confirmed, hold the tip of the voltage tester directly against the wire nuts where the house wires meet the fixture wires. If the tester lights up or chirps, power is still flowing through the box. If it remains completely silent and dark, it is safe to proceed.
Step 2: Removing the Old Light Fixture
With the power completely verified as dead, you can begin disconnecting the old fixture. Take a moment to look closely at how the wires are connected, as this serves as a blueprint for installing your new unit. If the wiring configuration looks complex, take a clear digital photograph with your phone for easy reference later.
Unscrew the plastic wire nuts by twisting them counterclockwise. Separate the fixture wires from the house wires completely. Keep the house wires spread apart so they do not touch.
While supporting the weight of the old fixture with one hand, use your other hand to remove the mounting screws anchoring the fixture bracket to the ceiling electrical box. Gently lower the old fixture away from the ceiling and set it aside. Inspect the existing electrical junction box inside the ceiling. Ensure it is securely anchored to a joist or framing member and is not loose or cracked, as it must bear the physical weight of your new lighting unit.
Step 3: Understanding Household Wiring Conventions
Standard residential electrical wiring in the United States follows a strict color-coding system. Familiarizing yourself with these conventions ensures you match the correct wires together during installation.
-
Black Wire: This is the hot wire, which carries the live electrical current from the breaker panel directly to the light fixture. In some older homes, this wire might be red.
-
White Wire: This is the neutral wire, which completes the electrical circuit by returning the current back to the panel.
-
Bare Copper or Green Wire: This is the ground wire. It serves as a safety path for electricity in the event of a short circuit, directing the dangerous current safely into the earth rather than through your body.
Modern light fixtures usually mirror these exact colors. However, some fixtures utilize clear or split two-conductor cords instead of colored wires. In these cases, the hot wire is typically smooth on the outside insulation, while the neutral wire features small ridges or a white stripe along its length.
Step 4: Connecting the New Light Fixture
Unpack your new light fixture and review the specific manufacturer assembly instructions. If the fixture is heavy or large, assemble the decorative shades, crystals, or glass components after hanging the main body to keep the unit as lightweight as possible during wiring.
Install the new mounting bracket provided with your fixture directly to the ceiling junction box using the supplied mounting screws. Ensure any grounding screw on the new bracket faces downward toward the room.
If you are installing a heavy chandelier or pendant, utilize the included safety chain or a helper to support the weight of the fixture while you make the electrical connections.
Begin by connecting the ground wires. Twist the bare copper or green ground wire from your ceiling together with the ground wire from the new fixture. If your ceiling box is metal, you must also wrap a portion of this ground wire around the green grounding screw on the mounting bracket, tightening it firmly. Secure the wire ends with a wire nut by twisting it clockwise until it is tight and no bare wire remains exposed below the plastic cap.
Next, connect the neutral wires. Bring the white house wire and the white fixture wire together, ensuring their bare copper tips are aligned side by side. Twist a wire nut clockwise over the pair until it locks firmly. Give both wires a gentle tug to ensure they are securely clamped inside the connector.
Finally, connect the hot wires. Twist the black house wire together with the black fixture wire, securing them tightly with a final wire nut.
Step 5: Securing the Fixture and Testing
Carefully tuck the connected wires back inside the ceiling junction box. Fold them gently rather than stuffing them forcefully, ensuring that no wire nuts loosen or detach during the process.
Align the decorative canopy of the new fixture over the mounting bracket screws or threaded post. Push the canopy flush against the ceiling and secure it tightly using the included decorative thumbscrews or finials. Ensure the canopy sits square and tight against the ceiling without pinching any internal wires.
Install the recommended lightbulbs into the sockets, paying close attention to the maximum wattage rating specified on the fixture label. Exceeding the maximum wattage can generate excessive heat, melting insulation and creating a fire hazard. Attach any remaining glass globes, shades, or decorative trim pieces.
Return to your main electrical panel and flip the circuit breaker back to the on position. Walk back to the room and flip the wall switch. Your new light fixture should instantly illuminate, signaling a successful and safe installation.
Frequently Asked Questions
What should I do if the wires coming out of my ceiling do not match the standard black and white colors?
In older homes, you might encounter alternative wire colors like blue, yellow, or red. A red wire is typically used in three-way switch setups or bedroom fan configurations where a separate wall switch controls the light independently from the fan motor. If your wiring is unconventional or confusing, do not guess. Stop the installation immediately and consult a licensed electrician to trace and verify the circuit before connecting your new fixture.
Can a standard ceiling junction box support a heavy modern crystal chandelier?
Standard plastic or metal electrical boxes are rated to support fixtures weighing up to 50 pounds. If your new light fixture exceeds 50 pounds, you must remove the existing box and install a heavy-duty, fan-rated brace box that anchors directly between the ceiling joists to provide the necessary structural support and prevent the fixture from pulling through the drywall over time.
Why do some modern light fixtures not include a ground wire?
If a fixture is constructed entirely out of non-conductive materials like plastic, glass, or heavy ceramic, it may not feature a dedicated ground wire. Because these materials cannot conduct electricity, there is no risk of the outer body becoming energized in a short circuit. In this scenario, simply fold the house ground wire neatly into the back of the ceiling box, ensuring it remains connected to the metal box or mounting bracket screw.
Is it acceptable to reuse the old wire nuts from the previous light fixture?
It is highly recommended to use the brand-new wire nuts included with your new fixture. Plastic wire nuts contain internal metal springs that expand and conform to the wire shape when twisted. Reusing old wire nuts can mean the internal springs are worn out or stretched, resulting in a loose connection that can cause electrical arcing and pose a significant fire risk.
What causes a newly installed light fixture to flicker when I turn it on?
Flickering is usually caused by a loose connection somewhere in the circuit. Turn the power off at the breaker panel immediately, remove the canopy, and verify that all wire nuts are twisted tightly and that no wires have slipped out of their connections. If the connection is solid and you are using LED bulbs, ensure your wall switch is compatible with dimmable LED technology, as older standard dimmer switches often cause modern bulbs to flicker.
How much bare copper wire should be exposed before twisting them into a wire nut?
Most wire nuts require roughly one-half to three-quarters of an inch of exposed bare copper wire to create a mechanically secure connection. Use your wire strippers to carefully clip away the plastic insulation to the proper length, ensuring you do not nick or score the underlying copper metal, which can weaken the wire and cause it to snap under tension.